Home
IT Hub
Microsoft

Configuring Data Loss Prevention Policies in Microsoft 365

Reco Security Experts
Updated
August 27, 2025
August 27, 2025

Microsoft 365 DLP helps protect sensitive information by detecting policy violations and triggering automated remediation actions such as blocking, warning, or alerting—across Microsoft cloud services and endpoints. It operates across Microsoft’s ecosystem, including Exchange Online, SharePoint, OneDrive, Teams, and Windows endpoints. Thus, DLP gives an organization the ability to block the sharing of sensitive data such as credit card numbers, health records, or financial data. 

This article provides information on DLP policy configuration in Microsoft 365 with step by step instructions, suitable examples, and implementation tips for technical teams toward establishing an effective and scalable data protection strategy.

Supported Locations and Key Capabilities

Microsoft 365 DLP supports the following locations:

  • Exchange Online: Emails and attachments
  • SharePoint Online: Files stored in document libraries
  • OneDrive for Business: Personal file storage
  • Microsoft Teams: Chat and channel messages (text only; files are governed by SharePoint/OneDrive DLP policies)
  • Microsoft Defender for Endpoint: On-device actions like copying to USB or uploading to web apps

You can apply a single policy across these services or scope it to specific workloads depending on your data protection needs. Each DLP policy can have multiple rules, conditions, actions, exceptions, and user notifications.

Creating a DLP Policy from the Compliance Portal

To create a DLP policy, follow these steps in the Microsoft Purview compliance portal:

Step 1: Go to the Compliance Portal

Visit https://compliance.microsoft.com, then select Data loss prevention > Policies > + Create policy.

Step 2: Choose a Template

Templates are available for regulatory frameworks like GDPR, HIPAA, or PCI-DSS. These templates include predefined sensitive information types. You can also choose Custom policy to define your own rules.

Step 3: Name and Scope the Policy

Give the policy a name and description. Choose which services to apply it to—Exchange, SharePoint, OneDrive, and Teams. You can scope it to specific users, groups, or locations.

Step 4: Define Rules

Rules determine the conditions for enforcement. You can define:

  • Conditions: What to look for (e.g., credit card numbers, content with certain labels)
  • Actions: What to do (e.g., block access, send alerts)
  • Exceptions: Exclude users, groups, or content types

Example:

  • Condition: Content contains 10 or more credit card numbers
  • Action: Block sharing with people outside the organization
  • Exception: File shared with Finance group

Step 5: Configure Notifications

Enable policy tips to notify users in context (e.g., when drafting an email). Set up incident alerts to be sent to administrators or security teams.

Step 6: Test or Enforce

You can choose to run the policy in test mode with notifications, test mode without notifications, or enforce it immediately. Testing allows you to tune the policy before rolling it out in production.

Example: PowerShell to List DLP Policies

You can use PowerShell to review existing policies.

Connect-IPPSSession
Get-DlpPolicy | Select Name, Mode, State

This helps in auditing current policies, checking their mode (test vs. enforce), and verifying whether they’re active.

Endpoint DLP: Extending Protection to Devices

Microsoft Purview DLP also integrates with Microsoft Defender for Endpoint to enforce data protection on Windows 10/11 devices. Actions you can block include:

  • Copying sensitive files to USB drives
  • Uploading files to personal cloud storage
  • Printing documents containing sensitive info
  • Copying content to the clipboard
File activity and data classification chart in Microsoft Endpoint DLP.
A Microsoft Endpoint DLP graph showing different file types and how they are monitored to protect sensitive data.

Setup Requirements:

  • Devices must be onboarded to Microsoft Defender for Endpoint.
  • Endpoint DLP must be configured in Microsoft Purview.
  • Rules must be scoped to device groups or security groups.

This is useful for preventing data exfiltration even when users are offline or working outside standard locations.

Creating Custom Sensitive Information Types

Built-in information types (e.g., U.S. Social Security numbers, credit card numbers) may not meet your organization’s specific needs. You can create custom sensitive information types using regular expressions and keywords.

For example, if your Employee ID follows the format EMP-xxxxxx, you can define a custom rule. This custom pattern can be uploaded using the Security & Compliance Center PowerShell or through the compliance portal.

Exact Data Match (EDM) for Structured Data

Use EDM when you need to protect structured data such as patient records, employee databases, or financial spreadsheets.

How EDM Works:

  1. Define a schema: Specify the fields (e.g., Name, ID, DOB) and data types in the structured dataset you wish to protect.
  2. Upload hashed data: Pre-process and hash your sensitive data.
  3. Reference in policy: Use the custom info type in DLP rules.

This approach reduces false positives and is ideal for detecting specific identifiers (e.g., medical record numbers) rather than patterns alone.

Monitoring and Tuning DLP Policies

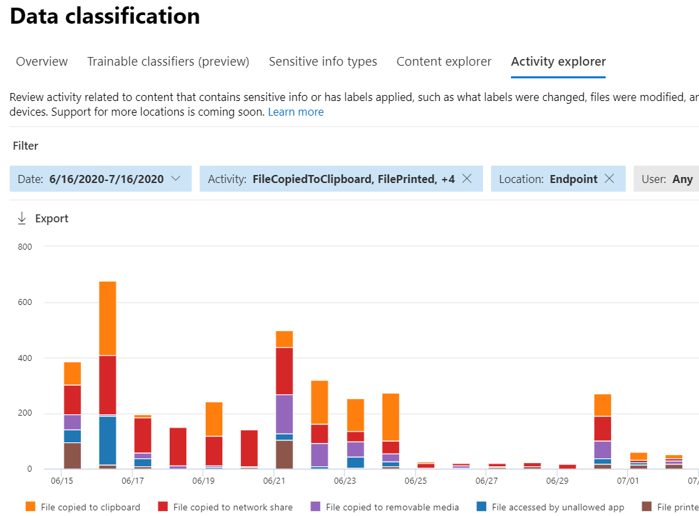
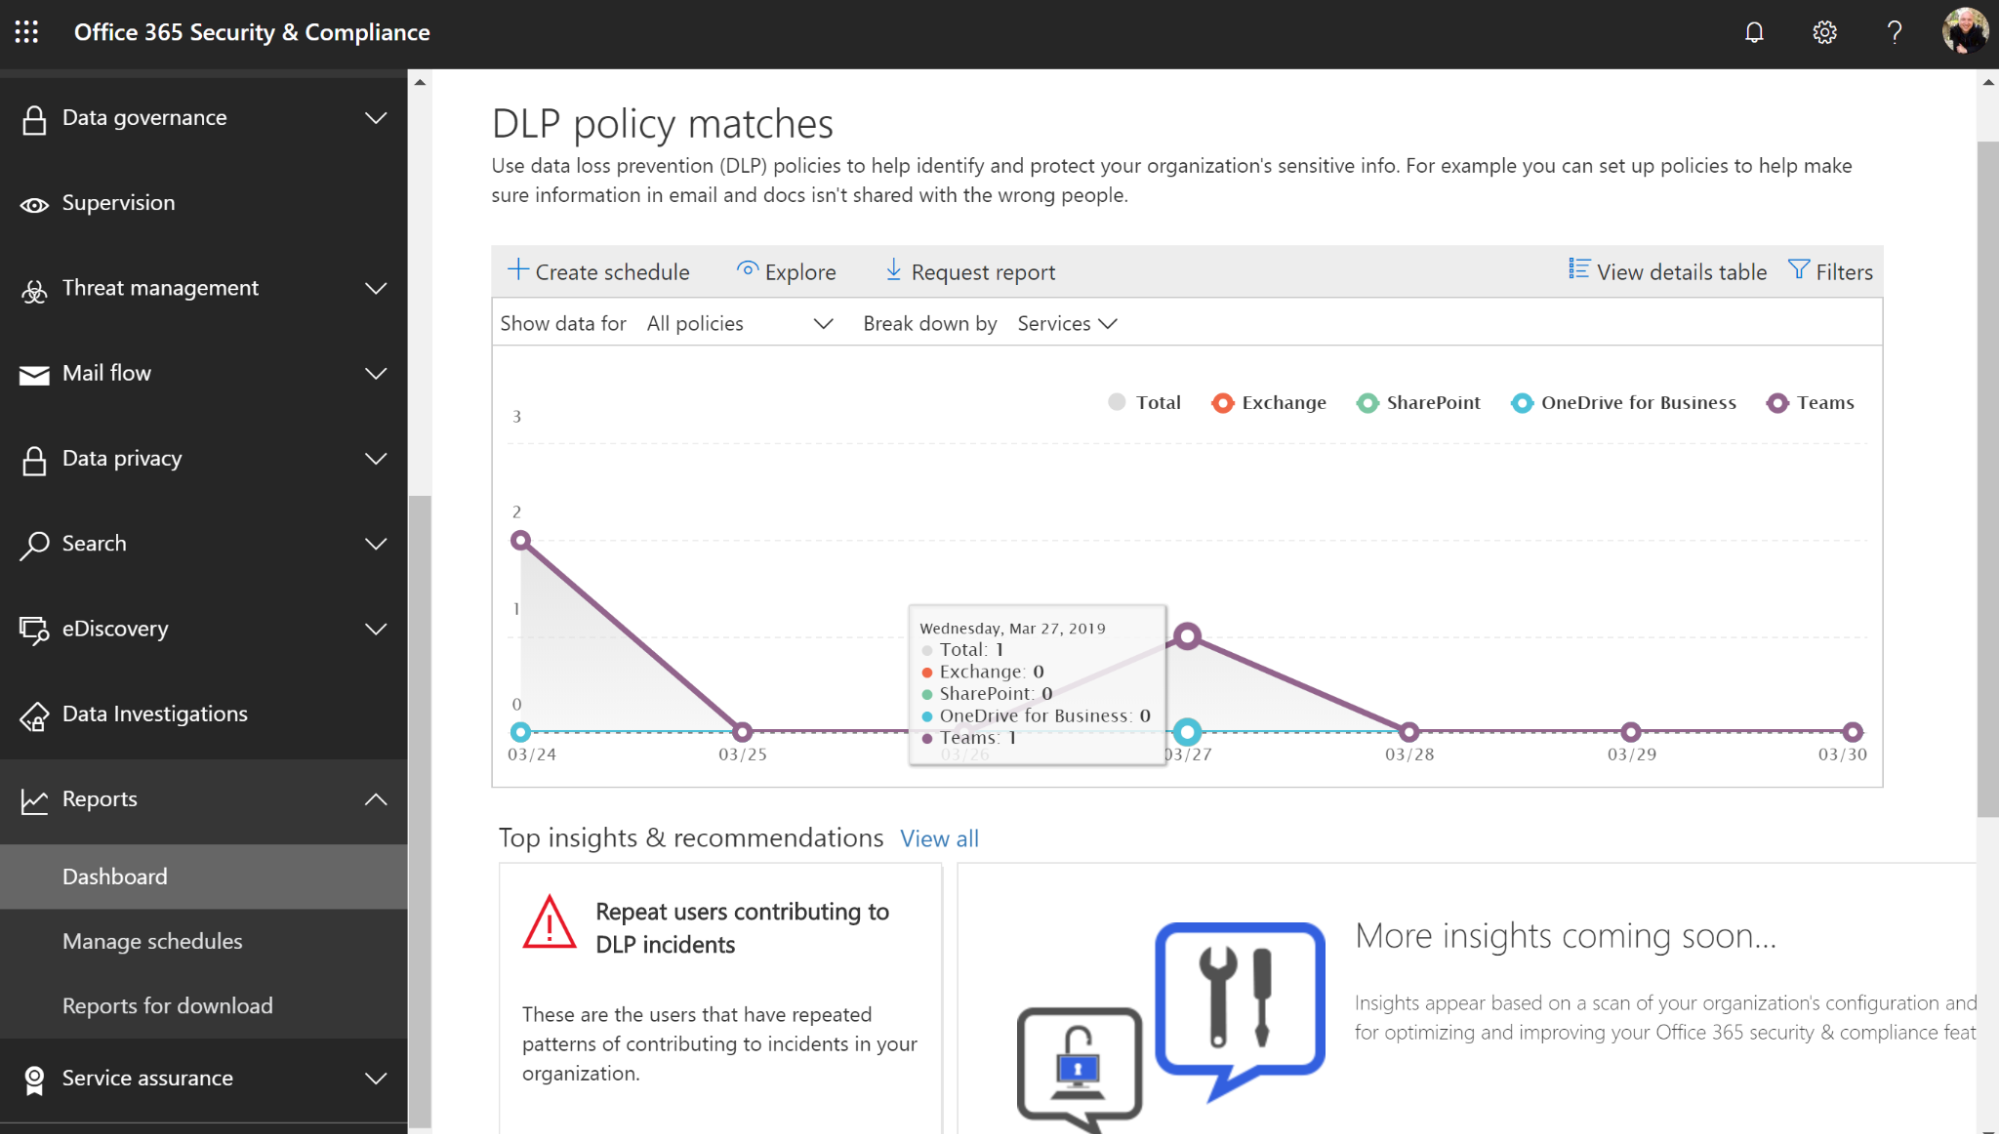
When the policy goes live, you must monitor it actively to make sure it is working properly and not creating any unwanted issues.

Available Monitoring Tools:

  • Activity Explorer: Tracks DLP matches with metadata like user, location, and action.
  • Alerts: Configurable thresholds for different rule matches.
  • Audit Logs: Accessed through the compliance portal or unified audit log search.

You can also export reports to your SIEM tool for long-term trend analysis.

Teams DLP: Special Considerations

DLP for Teams scans only text in chat and channel messages. File sharing in Teams is governed by SharePoint and OneDrive DLP policies.

Tips for Teams DLP:

  • Apply policies to both private and group chats.
  • Avoid blocking internal communication unless necessary.
  • Use policy tips to warn users without blocking legitimate work.
Chart and interface snapshots of setting up DLP policy for Teams and presenting policy tips to users.
Setup process of Data Loss Prevention policies in Microsoft Teams, including policy configuration steps and user notifications through policy tips during chats and channels.

Insight by
Gal Nakash
Cofounder & CPO at Reco

Gal is the Cofounder & CPO of Reco. Gal is a former Lieutenant Colonel in the Israeli Prime Minister's Office. He is a tech enthusiast, with a background of Security Researcher and Hacker. Gal has led teams in multiple cybersecurity areas with an expertise in the human element.

Expert Insight:


With the foundation in place, here are some practical insights and recommendations to help implement DLP effectively in real-world environments.

  • Start in Test Mode: You can start using the test mode that provides notifications for 2–3 weeks before enforcing any DLP policy. It will give you a clear picture of how often rules are triggered, and you will get time to fix false positives.
  • Use Exact Data Match (EDM): Structured data like patient or customer records should always use EDM to reduce false detections.
  • Leverage Auto-Labeling: Combine Microsoft Information Protection labels with DLP policies to apply protections more accurately based on classification.
  • Prioritize High-Risk Areas: Begin with Exchange Online and OneDrive, which are common data egress points.
  • Monitor Endpoint Activity: Use endpoint DLP to detect high-risk actions like printing sensitive documents or copying them to external devices.
  • Integrate with SIEM: Export DLP incidents into a SIEM and correlate attempts at data exfiltration with user behavior and security incidents.

Conclusion

This article describes the complete setup and configuration of DLP policies in Microsoft 365. Go slow; start small, carefully test a few policies, monitor the results, and then build up. A well-setup DLP approach can strongly shield your data without loss of productivity.

No items found.
EXPERIENCE RECO 1:1 - BOOK A DEMO

Discover How Reco Can Help You Protect Your Microsoft Environment

“I’ve looked at other tools in this space and Reco is the best choice based on use cases I had and their dedication to success of our program. I always recommend Reco to my friends and associates, and would recommend it to anyone looking to get their arms around shadow IT and implement effective SaaS security.”
Mike D'Arezzo
Executive Director of Security
“We decided to invest in SaaS Security over other more traditional types of security because of the growth of SaaS that empowers our business to be able to operate the way that it does. It’s just something that can’t be ignored anymore or put off.”
Aaron Ansari
CISO
“With Reco, our posture score has gone from 55% to 67% in 30 days and more improvements to come in 7-10 days. We are having a separate internal session with our ServiceNow admin to address these posture checks.”
Jen Langford
Information Security & Compliance Analyst
“That's a huge differentiator compared to the rest of the players in the space. And because most of the time when you ask for integrations for a solution, they'll say we'll add it to our roadmap, maybe next year. Whereas Reco is very adaptable. They add new integrations quickly, including integrations we've requested.”
Kyle Kurdziolek
Head of Security

Explore More

Ready for SaaS Security
that can keep up?

Request a demo